Draw or import a custom island shape
Crucible Heightmap can generate an island for you, and it can also build a map around an outline you decide. Draw one by hand in the app, or turn any picture into one (its background is removed for you), and the shape becomes a real island: terrain, a coastline, beaches, biomes and splats, lakes and cliffs, the same as any island Crucible rolls itself.
That makes it the fastest way to build a Rust map with a specific silhouette: a logo, a country, a layout you sketched on paper, or a map shape you have had in your head for a while.
Open the custom island panel
Section titled “Open the custom island panel”Press 4, or click the picture button at the right end of the island strip in the Generator sidebar.
The panel opens on Draw. The other side of the same switch, Image, makes the outline from a picture instead, with its own picture editor. Along the same top row you pick the kind of terrain you draw with.
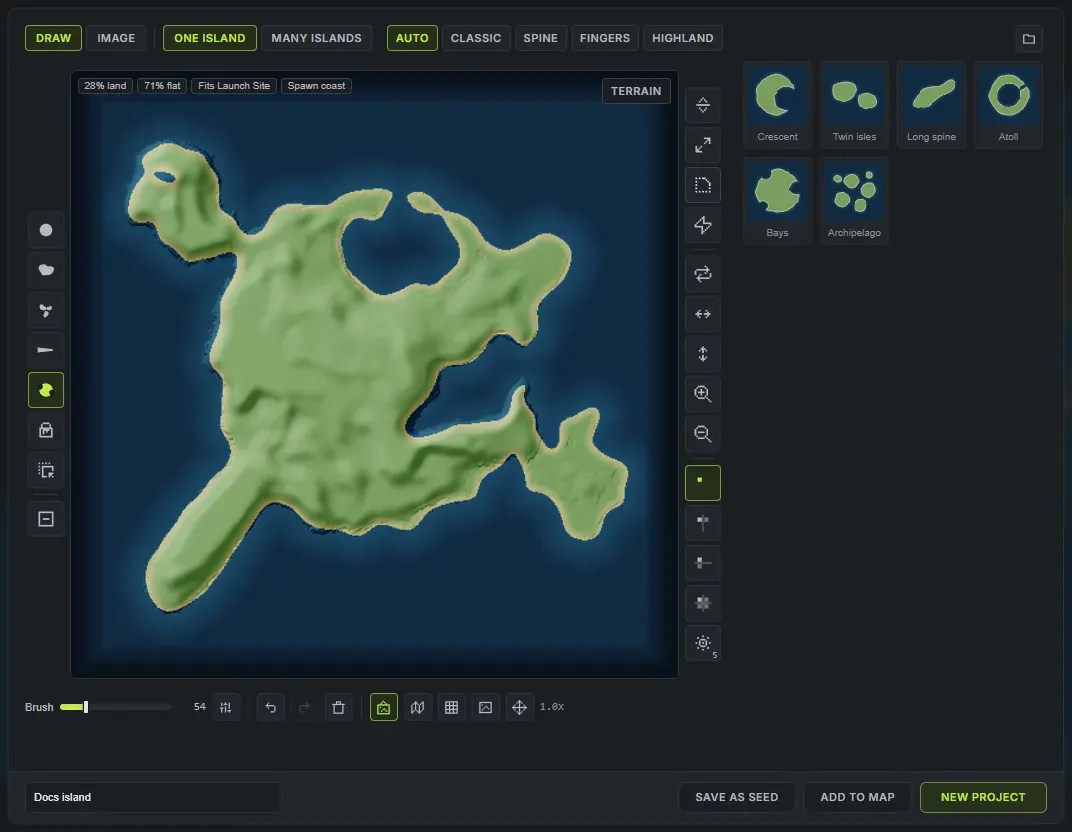
The square in the middle is the island, drawn the way the map will read it: land, a sand rim and open water around it, updating as you paint. A dim frame just inside its edge marks where the map fades into the sea, so land drawn into it fades too. The brushes sit in the rail on its left and the whole-drawing tools in the rail on its right.
The brushes
Section titled “The brushes”These are not general drawing tools. Each one lays down the kind of land a coastline is actually made of.
- Round is a plain brush, for blocking a body in quickly.
- Coast lays land with a broken, natural shoreline. This is the one to build the main island with, because a single drag already gives you headlands and inlets instead of a smooth edge.
- Blobs scatters islands and headlands as you drag. Good for an archipelago, or for a few islets off the coast.
- Spit starts at full width and tapers as you drag, so one stroke gives you a peninsula or a sand spit that narrows to a point.
- Coves bites bays and inlets out of the coast. It always removes land, whatever the erase toggle is set to.
- Fill floods an area with land, or with sea while erasing. Clicked on an island, it gives that island the terrain style you have picked.
- Move drags the whole drawing around the pad.
Erase turns any brush into its opposite, so the same coast brush that lays land also carves it away. Right-drag erases for one stroke without touching the toggle.
The Brush options button at the top of the brush rail holds two more: Coast rough (0 to 2, default 0.75) sets how broken the Coast brush draws the shore, and Steady (default 35%) smooths a shaky hand.
Working on the whole drawing
Section titled “Working on the whole drawing”The right-hand rail works on the entire outline at once, which is far quicker than brushing it by hand:
- Grow and Shrink push the coastline out or pull it in everywhere.
- Smooth rounds the shoreline off. It is a small step on purpose, so you can repeat it until it looks right.
- Roughen makes the coast irregular again, with a different result every press.
- Turn rotates the drawing a quarter turn (Shift-click turns it the other way), the two flip buttons mirror it, and bigger and smaller resize it by 10%.
Under those, the symmetry buttons repeat everything you draw: mirrored left to right, top to bottom, both ways, or radial, which repeats it round the middle. Click radial again to step through 3, 4, 5, 6 and 8 arms.
The rest of the pad
Section titled “The rest of the pad”Under the square: brush size, undo and redo, clear (the red bin), and how you are looking at it.
- The island preview toggle swaps your raw drawing for the land, sand rim and water the map will read.
- The terrain under the drawing toggle shows the terrain your drawing makes faintly under the pad, updating as you draw.
- Grid lays a grid over the pad.
- Trace loads a picture to draw over. Once one is loaded, the same button opens its settings: how strongly it shows, its size, its position, a different picture, or stop tracing.
- The wheel zooms up to 6x, Space-drag or middle-drag pans, and the button beside the zoom readout recentres it. Ctrl and the wheel resizes the brush.
The pad takes the keyboard while the panel is open, so none of the app’s shortcuts fire behind it and undo belongs to the drawing rather than to the map. Its keys (1 to 7 for the tools, E erase, [ and ] brush size, S symmetry, G grid, Tab terrain view, Enter make the map) are listed in keyboard shortcuts, and you can rebind them in Settings, Keybinds. Every tooltip shows the key it is bound to.
Your drawing is kept when you close the panel and even when you close the app, so it is still on the pad next time. Clear starts over.
See the real terrain before you commit
Section titled “See the real terrain before you commit”Show View, top right of the square (or Tab), flips it from your drawing to the actual map your shape will make, coloured like an exported map. It is built the same way the final map is, so what you see is what you get. Flip back with Draw View (Picture View on the Image tab).
Badges in the corner of the square read that map against real Rust maps:
- Land: the share of the map that is land, and its area. Rust’s own procedural maps carry about 52%.
- Flat: how much of the land is under 10 degrees, where players can build. Real maps sit at 60 to 66%, and the badge turns amber below 55%.
- Fits a monument: the biggest headline monument that has flat ground to sit on, or No monument room. Hover it to see which card monuments have nowhere to go.
- Spawn coast: whether there is beach new players can spawn on. Without it they spawn at the map origin.
- Too small (a drawing of several islands): how many of them are under 0.25 km², too small to get a road of their own.
Pick the terrain style
Section titled “Pick the terrain style”The style switch on the top row is the kind of hills and mountains you draw with. It works like a brush colour: picking a style sets it for what you draw next, and land you have already drawn keeps the style it was drawn in.
- Auto picks the style that suits each island’s shape.
- Classic: rolling hills, a few mountains and plenty of flat ground to build on.
- Spine: taller, sharper mountains and steeper coasts.
- Fingers: low, gentle ground with small hills, the most buildable land.
- Highland: high, flat tablelands with cliffy coasts.
Every separate piece of land you draw becomes its own island on the map, in the style it was drawn in, so a Spine ridge and a Classic island next to it stay what you drew. One connected island takes the style most of it was drawn in. To change an island’s style, pick the style and click the island with Fill, or draw over it.
With the island preview on, the drawing shows each island’s hills and mountains as shading, so you can see the difference before you make the map. Every value can still be changed on the sidebar afterwards.
Your drawing keeps the size you drew it
Section titled “Your drawing keeps the size you drew it”The pad is the map square, so where you put the island and how big you made it are both decisions the app keeps. Draw a small island off to one side and you get a small island off to one side, with open ocean around it, rather than a shape blown up to fill the map.
Imported pictures are fitted to the map instead, clear of the faded edge, because a photo’s framing is arbitrary and the subject can be any size in the frame.
Make an island from a picture
Section titled “Make an island from a picture”Switch to Image and click Choose image, or just drop a picture anywhere on the panel: a photo of an animal or an object, a logo, a drawing on paper, a map. PNG, JPEG, WebP and 16-bit RAW all work, and Crucible’s own RAW exports come back in without any setup.
The square becomes a picture editor. The picture’s subject is cut out and shown on a checkerboard, the way a background remover shows it, with what was removed faintly behind it (the eye button hides it) and the cut’s edge outlined in green. Whatever is kept becomes the island; the background becomes the sea.
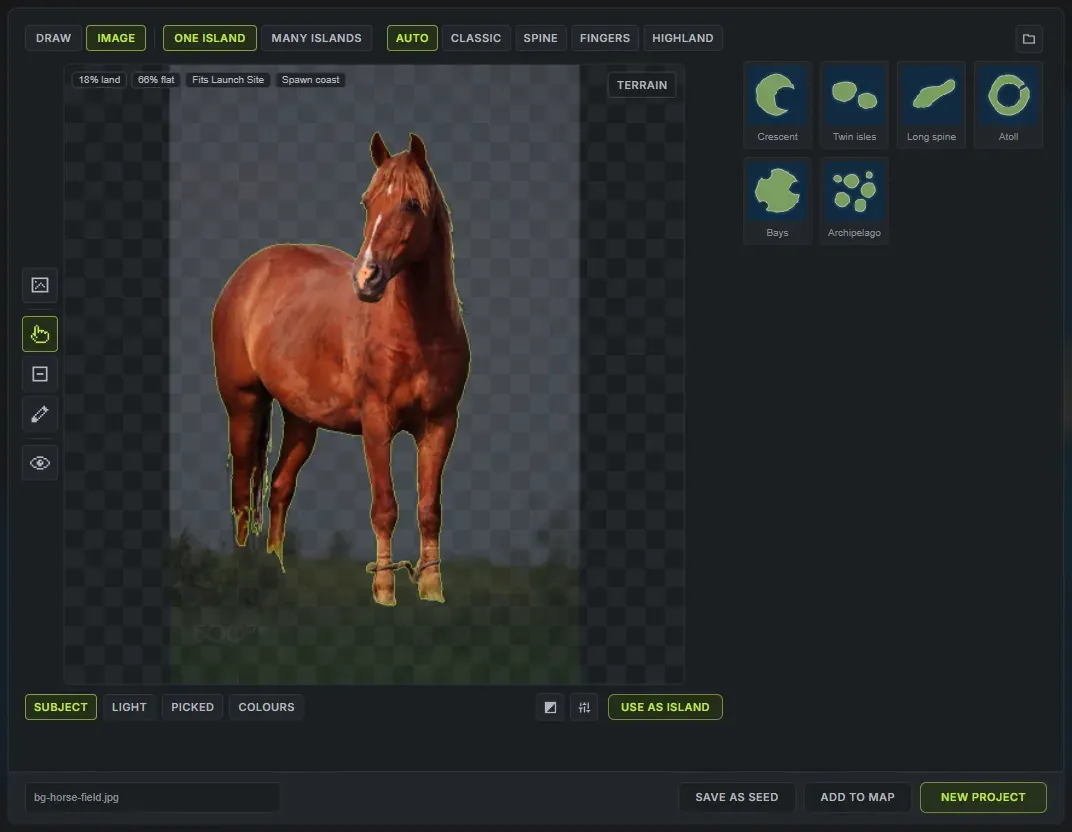
- The background is removed for you. The Subject rule finds the subject on its own within a few seconds. A picture that already has a transparent background uses its own outline straight away.
- Select (the pointer): click a part of the picture to add it to the cut. Click the same spot again to take in more around it. Right-click, or Shift-click, a part to take it away.
- Erase and Restore: brush the cut by hand, for the last details. Right-dragging does the opposite of the tool.
- Ctrl + Z steps back one click or stroke, and the reset button goes back to the automatic cut.
The first time you use a picture, Crucible downloads a one-time extra (about 170 MB), shown in the corner of the square. You can keep working: a rough cut shows at once, and the full cut replaces it when the download finishes, keeping your clicks.
Subject reads almost every picture. For one it cannot, the arrow on the Subject button opens the other rules, which make the cut differently; every editing tool works on top of them:
- Light: everything lighter than the Cutoff, which suits a white silhouette on black.
- Picked: click the land in the picture to pick its colour. Hold and drag right to take in more, left for less, or set Range.
- Colours: the picture reduced to a few colours. Click each swatch to make it land or water.
Swap land and water handles a picture drawn dark on light. The sliders button (Clean up the outline) holds the rest: Edge grows or shrinks the coast, Close gaps fills an outline drawn with breaks in it, Smoothing rounds a jagged coast, Min island drops specks, and Fill lakes fills enclosed water (at All, an outline drawn as a closed line becomes solid land). If something about the picture will make a poor island, a badge on it says so, with the reason in its tooltip.
When the cut looks right, Accept Edits puts it on the drawing pad as your island’s outline, where every brush works on it and the map is one click away. You can also make the map straight from the Image tab with the buttons in the footer.
Making the map
Section titled “Making the map”Give the shape a name, then:
- New project clears the map and builds a fresh one from your shape (Enter does the same).
- Save as seed does the same and also saves it to your seeds, so you can come back to it or share it.
- Add to map puts the shape on the map you already have open as one more island, keeping everything else.
If the open map has unsaved changes, the panel asks before replacing it: Save first, Discard and make map, or Cancel. If a button is greyed out, hover it and it will tell you why.
To close the panel without making a map, click outside it or press Escape. Your drawing stays in the pad for next time.
The shape library
Section titled “The shape library”Every shape you make a map from is kept in the library on the right of the panel. Click a card to open it back in the pad, as that shape: change it and make the map again, and the panel asks whether to Update the saved shape or Save a copy. Two shapes cannot share a name, so a name already in use turns the field red.
Hover a card for its actions: make a map from it straight away, Rename it, or Copy it under a new name. The bin in its corner deletes it, and Ctrl-click or Shift-click picks several to delete at once. Islands already on a map keep their shape whatever happens to the library. The library sorts newest first or by name, and a search box appears once it holds a dozen shapes. Until you have saved four shapes, the library also offers a handful of starter shapes to build from.
Every shape is a small .hmshape file in your shapes folder, and the folder button at the top of the library opens it. To share a shape, send its file; dropping a shape file on the panel adds it to your library.
What happens to your shape
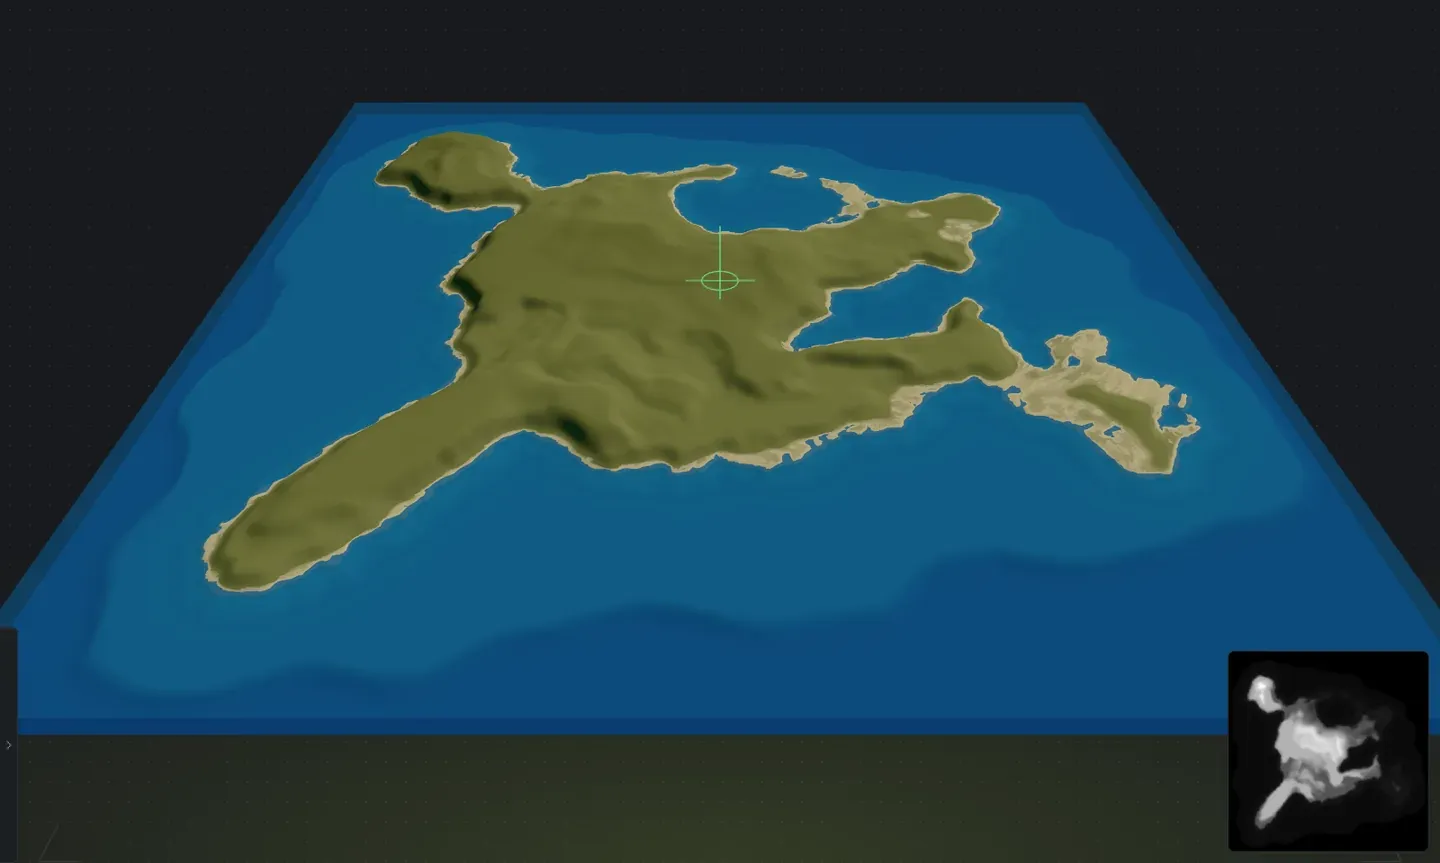
Section titled “What happens to your shape”Your outline decides where the land is. Everything else is still generated: the height, the mountains, the erosion, the beaches, the biomes and splats, the lakes and the cliffs. Every slider in the Generator still works on it, so the same island can be flat and sandy or mountainous and forested.
A drawn island gets two extra rows in the sidebar: Coast roughness, how ragged its shoreline is (low keeps it close to the line you drew), and Cliff coast, from a gentle climb behind the beach to a cliff at the waterline. Shape variant re-rolls the small wobble along its coast and the hills inside, never the outline.
Conjure keeps your drawing and rolls fresh terrain inside it. Turning, flipping or resizing a drawn island works around its own middle, the same as any other island.
Next steps
Section titled “Next steps”- Generate the world so the island gets biomes, splats and topology.
- Cut channels through the shape, or inlets into its coast.
- Paint biomes and splats by hand where you want something specific.
- Export a .map file and open it in RustEdit.