
Sockets
Some Rust prefabs are built to join: a cave corridor has a mouth at each end, an underwater lab module has a doorway on every face, a train tunnel tile meets its neighbor on a shared edge. Creator reads those openings as sockets, and a piece dragged near a compatible one snaps onto it exactly, with no typing of coordinates. The Sockets tool shows you every socket in a prefab document, tells you which are joined, and lets you author sockets on pieces that ship with none.
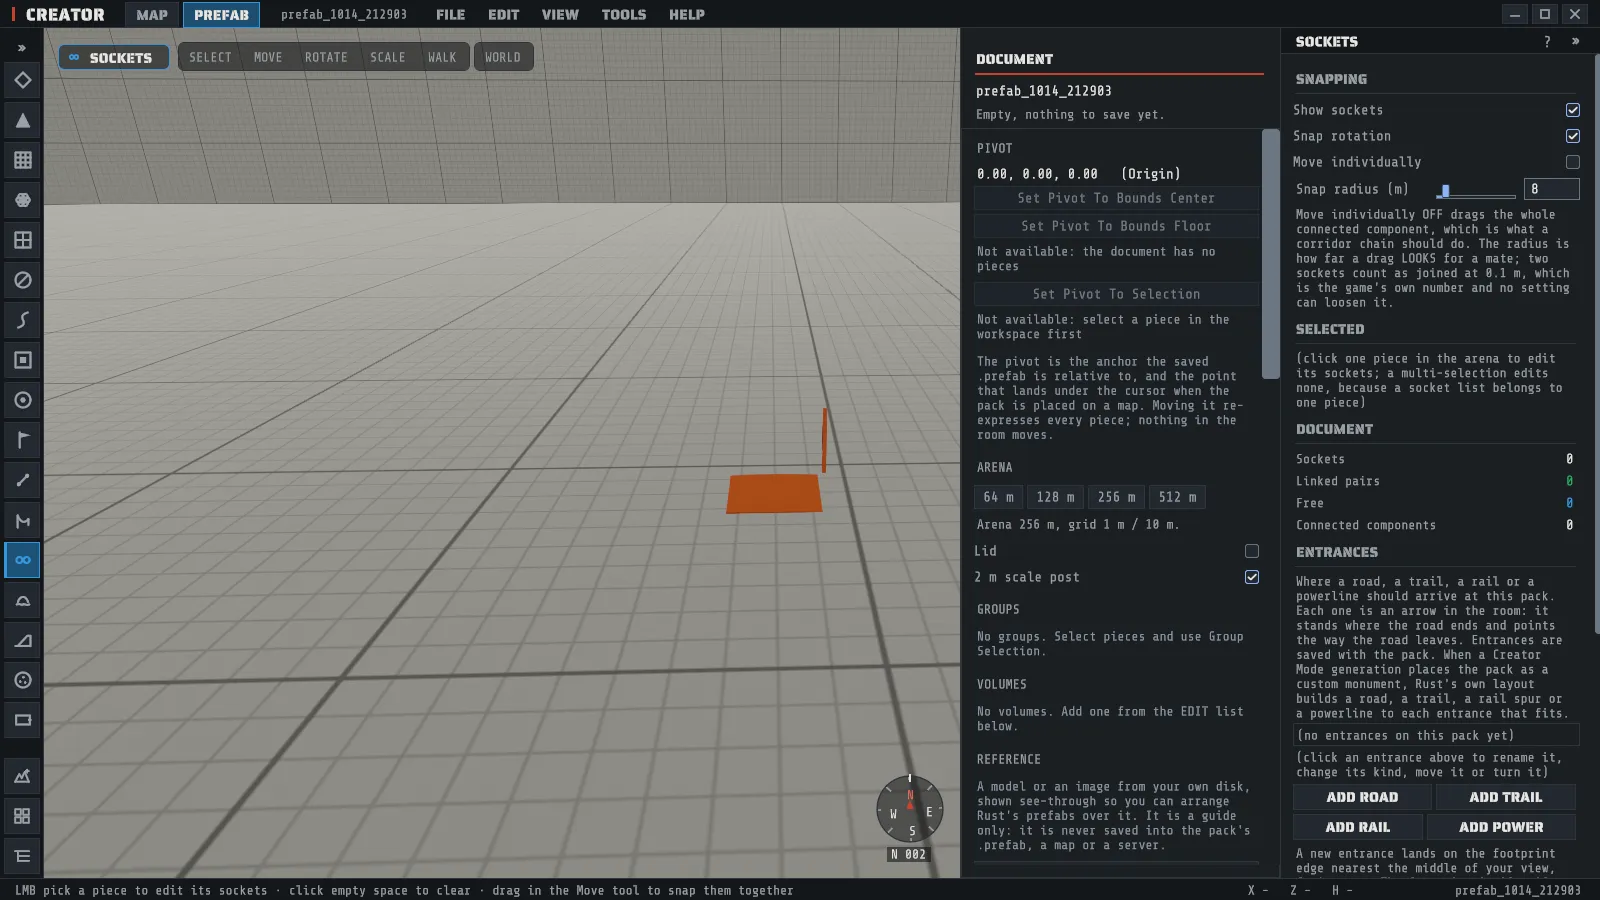
Press O or pick Sockets on the tool rail. The SOCKETS panel opens in the inspector, beside the prefab document’s DOCUMENT panel, so the document’s editing commands stay in reach while you work on sockets. The status bar then reads:
LMB pick a piece to edit its sockets · click empty space to clear · drag in the Move tool to snap them togetherSockets live in a prefab document, not on a map. The tool works in the prefab workspace, where you are building one pack out of several pieces. On a map the panel says so and shows nothing, because a map has no sockets to join: your snapping settings are kept either way.
The four rings
Section titled “The four rings”With Show sockets on, every socket in the document draws a ring at its opening, facing the way the opening faces. There are four states and each has its own color.
| Ring | What it means |
|---|---|
| Blue | Free: open, and compatible with whatever you are dragging |
| Green | Mated: joined to another socket |
| Amber, with a wider second ring | The candidate: the join that will be made when you let go |
| Gray, dashed | Cannot mate: wrong family, type or gender |
The wider amber ring is a pulse around the pair that is about to join, so you can see the join before you commit it. Both halves of the pair wear it.
Snapping two pieces together
Section titled “Snapping two pieces together”The snap happens in the Move tool, not in this one. This tool decides what a socket is; Move is where you drag.
- Place two pieces in the workspace from the prefab browser. With one piece selected, a piece you place within the snap radius of one of its free openings snaps onto it.
- Switch to Move and drag one piece so its opening is near the other’s.
- When a compatible free socket comes within the snap radius, both rings turn amber and the piece jumps onto the exact join.
- Let go. The move and the join are recorded as one undo step, so a single Ctrl+Z puts the piece back where it was and breaks the joint again.
The snapping settings
Section titled “The snapping settings”These four sit at the top of the panel and are kept between sessions, maps and documents.
| Setting | What it does |
|---|---|
| Show sockets | Draws the rings. On by default |
| Snap rotation | The snap turns the piece to face its partner as well as moving it. On by default, which is what the pieces are authored for |
| Move individually | Off drags the whole joined chain, on drags the one piece and breaks its joints. Off by default |
| Snap radius | How far a drag looks for a mate. 8 m by default |
The radius is how far the snap looks. Raising it makes the snap reach further; it never makes a sloppier joint.
Where a piece’s sockets come from
Section titled “Where a piece’s sockets come from”The prefab browser marks every piece that has sockets, and says where they came from, because the three are not the same claim.
| Mark | Where the sockets came from |
|---|---|
| GAME DATA | Rust’s own socket data: underwater lab modules, train tunnel tiles and shafts, coastal cliff anchors |
| DERIVED | Creator worked them out for the cave kit |
| YOURS | You authored them, in this document or in your saved kit sockets |
| NO SOCKETS | Creator has an entry for the piece and no socket for it, so it will not snap |
A piece with no mark at all has no socket entry and joins on the grid instead, like a building block.
Growing a whole structure
Section titled “Growing a whole structure”Joining pieces by hand is the way to build one room. To build a hundred, the dungeon generator joins them for you: you list the pieces, how often each may appear and how far to grow, and it snaps piece to piece at these same sockets, into this document or onto your map. Growing into a document, it uses the sockets you authored on that document’s pieces.
Authoring sockets on a piece
Section titled “Authoring sockets on a piece”Pick one piece in the arena and its socket list appears under Selected. Selecting a piece keeps the SOCKETS panel in the inspector rather than switching it to TRANSFORM; to move or turn the piece, pick Move or Rotate in the tool strip and the TRANSFORM panel takes the inspector. Each row shows the socket’s name, its family, its gender and its type tag, with a colored dot for its state; the row’s tooltip says where that socket came from.
- Click a row to edit it. Name, Type, Position and Rotation are text fields, and
position and rotation read
x y zin the piece’s own space. - Click ADD SOCKET for a new one at the piece’s origin, then drag it out with the position field.
- Click DETECT OPENINGS to have Creator propose one socket at the center of each face of the piece’s bounds, facing outward.
- Click DELETE SOCKET to remove the one you are editing.
Every one of those is a single undo step, and the rings update as you type.
A socket’s name is its identity. Socket names must be unique and not blank. Renaming a socket that is already joined keeps the joint; deleting one breaks it, as it must.
What DETECT OPENINGS actually does
Section titled “What DETECT OPENINGS actually does”It proposes six sockets, one at the center of each face of the piece’s bounds, each facing out of that face. It is a starting point you drag onto the real opening, not a measurement of the piece’s mesh. For a room-shaped piece whose doorways sit on its walls, the proposals usually land close; for a curved or irregular piece they will not, and you move them. Pressing it twice adds nothing the second time, so it is safe to press again after you have deleted the proposals you did not want.
Saving sockets for every future document
Section titled “Saving sockets for every future document”SAVE TO MY KIT SOCKETS keeps the selected piece’s sockets on this machine, so every prefab document you open from now on sees them. A document that carries its own sockets for a piece still wins, which means a pack you send to someone else snaps the way you built it even though they never authored anything. See Where your files live for the file it writes. If your saved sockets cannot be loaded, the button says why.
Entrances: where a road or a rail should arrive
Section titled “Entrances: where a road or a rail should arrive”The Entrances block, under Document, marks where a road, a trail, a rail or a powerline should arrive at the pack you are building. An entrance is not a socket: nothing snaps to it. It is a point on the pack and a compass heading, saved with the pack.
- Look at the side of the pack the road should come to, and click ADD ROAD, ADD TRAIL, ADD RAIL or ADD POWER. The entrance lands on the edge of the pack’s footprint nearest the middle of your view, facing out.
- Click its row to edit it. Entrance name, Entrance position and Facing (degrees) are text fields; the ROAD, TRAIL, RAIL, POWER strip changes its kind.
- Click MOVE TO VIEW to send it to the edge nearest the middle of your view again, or DELETE ENTRANCE to remove it.
Each entrance draws an arrow in the room, under the same Show sockets switch as the rings. The arrow stands
where the road ends and points the way it leaves. The arrow cannot be dragged: an entrance moves with
MOVE TO VIEW or by typing its position, and the block says so. Position reads x y z in meters from the
pivot, and facing is a heading in the pack’s own frame:
0 faces +Z, 90 faces +X. Every edit is one undo step.
An entrance has to fit the pack. The footprint is the pack’s terrain pad when it has one, and otherwise its pieces with 8 meters around them. The limits are the ones Rust’s own monuments keep.
| Rule | Limit |
|---|---|
| Where it stands | On the footprint’s edge, up to 25 m inside it measured the way it faces, or up to 7.5 m outside it |
| Which way it faces | Level, and within 45 degrees of straight out of the edge it leaves through |
| How many | Up to 3 road, 4 trail, 2 rail and 1 power on one pack |
| How close | Two road entrances, or two trail entrances, at least 15 m apart; two rail entrances at least 9 m apart |
An entrance that breaks a rule turns its arrow and its row’s dot red, and its row says which rule and by how much. One more entrance of a kind that is already full is refused when you add it.
Entrances are saved with the pack. When a Creator Mode generation places the pack as a custom monument, Rust’s own road and rail layout builds to each entrance that fits. A pack with no entrance is placed the way it always has been.
Reading the document roll-up
Section titled “Reading the document roll-up”The Document block counts the whole document, not the selection.
| Row | What it means |
|---|---|
| Sockets | Every socket on every piece in the document |
| Linked pairs | How many joints exist |
| Free | Sockets still open |
| Connected components | How many separate chains the pieces form. One means everything is joined to everything else |
Connected components is the one to watch before you save: a pack you thought was one chain that reports two has a joint you believe in and Creator does not.