
Custom prefabs
A custom prefab is your own collection of Rust prefabs saved as one reusable piece: a guard post, a
bridge, a whole compound. Save a selection once, then place it anywhere, on any map, as a single undo
step. The file Creator writes is the same .prefab RustEdit uses, so packs move between the two tools.
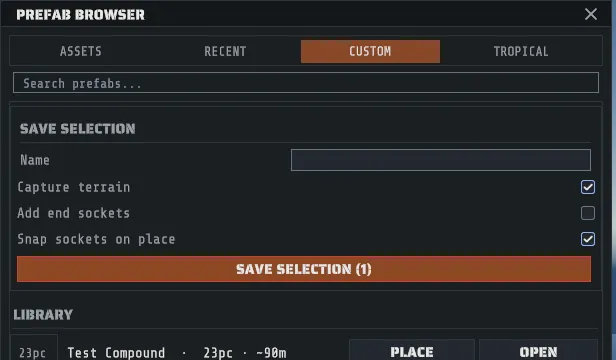
Save a selection
Section titled “Save a selection”- Select the prefabs you want, on the map (see Select and transform).
- Open the Prefab Browser (
R) and go to the CUSTOM tab, or use EDIT > Save Selection as Custom Prefab…, which lands you on the same bar. - Type a name. Leave it blank and you get a dated one.
- Leave Capture terrain on to bake the ground under the selection into the pack, so placing it brings its own height and ground textures with it.
- Turn on Add end sockets if the piece should snap end to end to copies of itself.
- Click SAVE SELECTION, which counts what it is about to save.
Snap sockets on place is the third checkbox, and it is a placement setting rather than a save one: with it on, a pack you place mates onto a compatible free socket nearby instead of dropping loose.
The library
Section titled “The library”The rest of the CUSTOM tab is your library, one card per pack: its thumbnail, its name, its piece count, its footprint in meters when it carries terrain, and its socket and group counts. The search box filters by name. PLACE drops the pack on the map where the center of your view meets the ground (25 meters ahead when you are looking at the sky) as one undo step, and OPEN opens it in the prefab workspace to edit, with every piece in the room where it was saved.
A card with no picture is normal: a pack imported from another editor never had a thumbnail, so the card shows its piece count instead. A card that cannot be read says why, on the card. Creator’s own packs appear in the library; yours are never overwritten. Where the folder is: Where your files live.
The prefab workspace
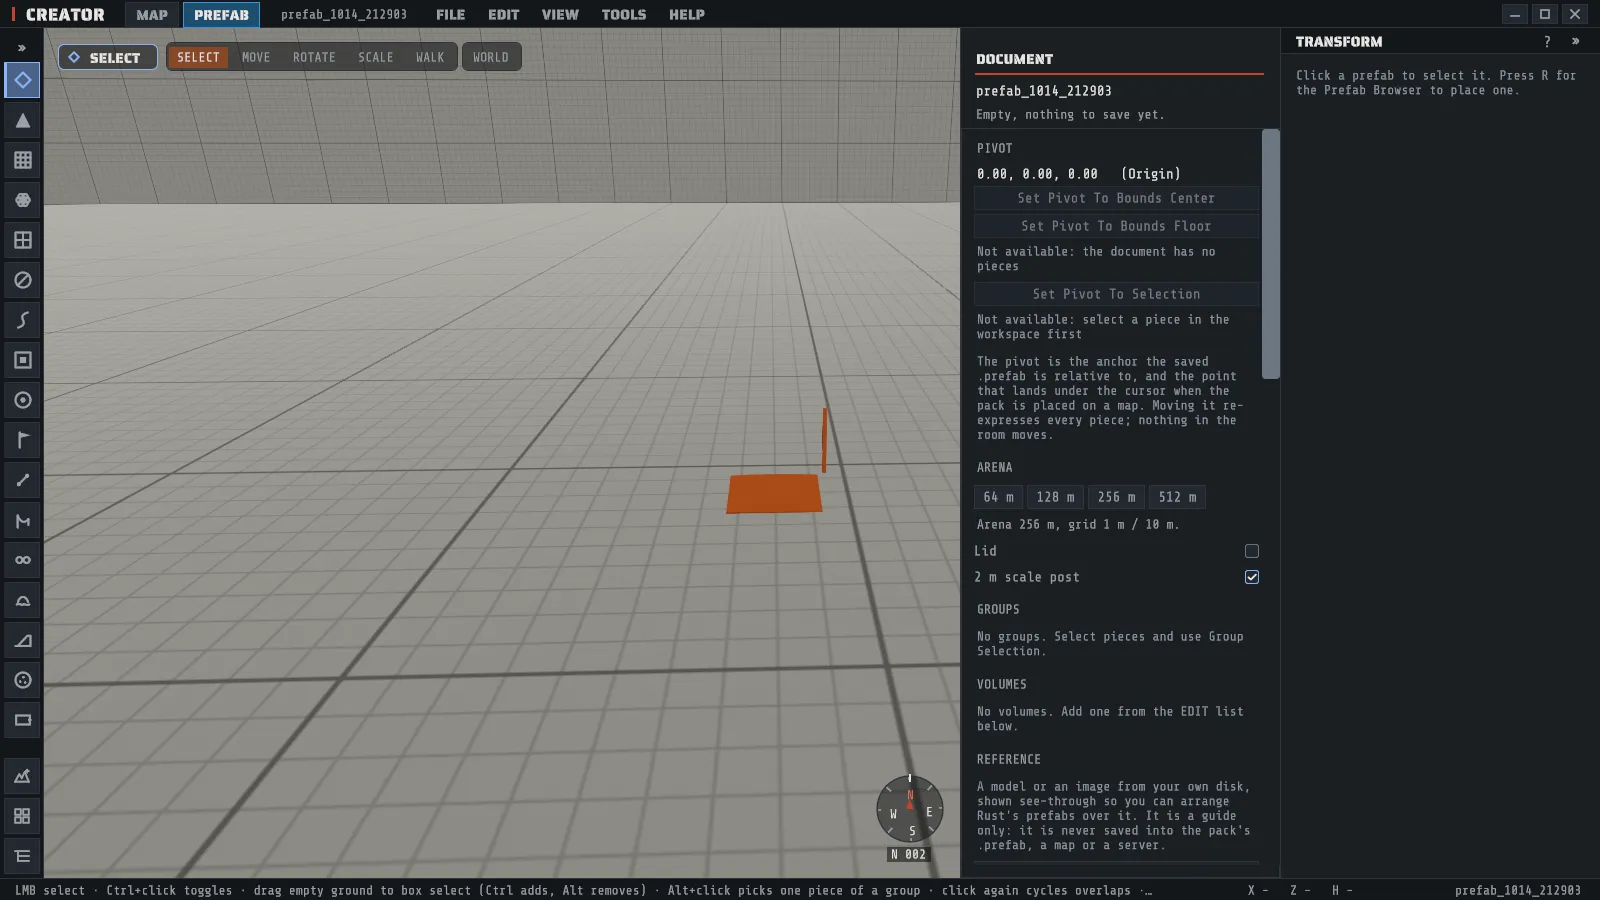
Section titled “The prefab workspace”The workspace is a clean white room for building a pack with no map in the way. It opens four ways: the PREFAB tab in the menu bar, OPEN WORKSPACE on the start screen, FILE > New Prefab… or FILE > Open Prefab…, and OPEN on a library card.
The mode tabs
Section titled “The mode tabs”MAP and PREFAB sit beside the Creator wordmark in the menu bar, and they are always there.
The highlighted one is the document you are editing; clicking the other one switches to it, and F4
does the same from the keyboard. Hovering a tab names the document it will take you to, with a * in
front when that document has unsaved changes. A greyed PREFAB tab tells you why in its tooltip: the
workspace spawns real Rust prefabs, so it needs your Rust content the same way LOAD MAP does,
and it waits for a map that is still placing prefabs to finish.
Switching hides a document, it never unloads one. The map stays exactly as you left it, both documents keep their own unsaved dot, and closing the app asks about both.
Each prefab document keeps its own pieces in the room. Starting or opening another prefab shows only that one’s pieces, and clicking can only pick a piece of the document you are editing. Close Prefab takes the document’s pieces out of the room with it. If the workspace cannot open right now (a map still placing prefabs, for example), New Prefab and Open Prefab say why and leave you on the map.
With no map open
Section titled “With no map open”Opening the workspace from the start screen (or from a recent-prefab card there) gives you the full
editor with no map behind it: the menu bar with its mode tabs, the tool rail, the prefab browser, the
inspector, undo and redo, and Ctrl+S. The tools that work on a prefab are all there (Select,
Move, Rotate, Scale, Sockets, and Sculpt and Paint for the pack’s own terrain
pad). The tools that edit a map’s own data (Paths, Volumes, Spawn Points, Map Markers, IO Wiring,
Zipline, the Island Stamp and the Prefab Brush) say that no map is open instead of switching. With a map loaded, the same
tools ask you to switch to the MAP tab while you are editing a prefab, so they never change the map
behind the room.
With no map open, MAP, F4, CLOSE WORKSPACE, FILE > New Map… and FILE > Unload Map all
take you back to the start screen. If the prefab has unsaved changes you are offered SAVE AND LEAVE,
LEAVE UNSAVED or GO BACK. Leaving never throws your work away: the document stays open,
OPEN WORKSPACE shows it again, and closing Creator from the start screen still asks about it.
FILE > Load Map… opens the map as usual, and your prefab document stays open behind the
PREFAB tab.
The document panel
Section titled “The document panel”The DOCUMENT panel is everything about the pack you are building. In the workspace it has its own
column on the right, beside the inspector, so the two are always on screen together: DOCUMENT with
its editing commands, and next to it the panel of the tool you are using (TRANSFORM for a selected
piece, SOCKETS with the Sockets tool, which is also where you mark the pack’s
entrances). Each column scrolls on its own when the
window is short, and hiding the inspector with I leaves DOCUMENT where it is. On a map there is no
DOCUMENT column and the inspector sits where it always does.
| Block | What it holds |
|---|---|
| Name and save state | The document’s name, and whether it has unsaved changes or has never been saved |
| PIVOT | The pivot’s position and how it was chosen, with the three one-click choices below it |
| ARENA | The room: a 64 m, 128 m, 256 m or 512 m side, a Lid, and a 2 m scale post for reference |
| GROUPS | Each persisted group in the pack with its member count |
| VOLUMES | The app-only volumes the pack carries, by kind |
| REFERENCE | The reference models you are tracing over: 3D files from your own disk, shown see-through as a guide and never saved into the pack |
| EDIT | Every editing command, live or greyed with its reason |
| FILES | The files this pack is, and SAVE PREFAB, SAVE AS, EXPORT THUMBNAIL, PLACE ON MAP and APPLY BACK |
The prefab browser works exactly as it does on a map, so you build by placing real Rust prefabs into the room. What you see is what the pack is: every piece you place, move, turn, scale, duplicate or delete in the room is what SAVE PREFAB, the autosave, the thumbnail and PLACE ON MAP write. A piece whose prefab your Rust content cannot draw stays in the room as a named, empty placeholder: it keeps its place and is saved with the pack, and nothing is removed. CLOSE WORKSPACE at the foot of the panel leaves the workspace: back to the map when one is open, and back to the start screen when none is (see With no map open).
The FILE menu
Section titled “The FILE menu”FILE carries the prefab document’s own block, separate from the map’s so you never have to work
out which file a save touched: New Prefab…, Open Prefab…, Save Prefab, Save Prefab As…,
Export Thumbnail and Close Prefab, then Edit Selection In Workspace, Apply Back To Map
and Place On Map. Ctrl+S saves whichever document is active, and the mode tabs say which that is.
Closing a prefab with unsaved changes asks first, and SAVE there saves the prefab.
The pivot is the pack’s origin
Section titled “The pivot is the pack’s origin”Every piece in a pack is stored relative to one point, the pivot, and that point is where the pack lands when someone places it. Moving the pivot moves nothing in the world; it changes where the pack lands when placed. Set Pivot To Bounds Center, Set Pivot To Bounds Floor and Set Pivot To Selection are the three one-click choices in the panel’s PIVOT block, and the floor is usually what you want for something that stands on the ground.
The editing commands
Section titled “The editing commands”All of these are on the document panel and on the right-click menu over a piece, which render one list rather than two. Each one that changes the pack is a single undo step, and one that cannot run right now shows you the reason instead of doing nothing. Undoing Array, Mirror or Repeat takes their copies out of the room again. The ones that change the room rather than the pack (the grid snap, the orbit view, adding the terrain pad and the proxy outlines) are not undo steps, the same way the arena’s own size is not. Level The Terrain Pad and Remove Terrain Pad are: each throws away ground you may have sculpted, so one undo gives it back.
| Command | What it does |
|---|---|
| Set Pivot To Bounds Center / Bounds Floor / Selection | The three pivot choices, on the PIVOT block |
| Group Selection / Ungroup Selection | Persisted groups inside the pack, one level deep |
| Array 5 x 10 m along X | Copies the selection along an axis at a fixed step |
| Repeat 5 along the exit socket | Chains copies socket to socket, the same mate a drag makes, so the chain is indistinguishable from one assembled by hand |
| Align Min on X | Lines the selection up on one axis of the pivot, so a turned pivot aligns along its own X |
| Distribute on X | Spaces three or more pieces evenly between their own extremes, on the pivot’s axis |
| Mirror across X | Reflects the selection |
| Snap Selection To Grid, Toggle Grid Snap, Grid Cell 1 m / 10 m | The room’s own 1 meter and 10 meter grid |
| Orbit Camera About Pivot | Swaps the fly camera for an orbit around the pivot |
| Add Terrain Pad (fit to the pack), Level The Terrain Pad, Remove Terrain Pad | Real terrain inside the room, sized to the pack, so you can sculpt and paint the ground that ships with it. A pack that already has ground starts the pad from that ground. The room has one pad, so Add is greyed while another prefab document has it, and names that document |
| Add Prevent-Building Volume, Delete Selected Volume | The app-only volumes a pack carries with it, and takes with it every time it is placed |
| Toggle Volume Proxies | Turns the volume outlines on and off: the pack’s own volumes, and any volume prefab standing in the room. It flips VIEW > Volume Overlay and VIEW > No-Build Zones together (both start off) |
The numbers in those labels are today’s defaults, named out loud so a click is never a surprise.
Mirror has one honest limit. Pieces carrying sockets can’t be mirrored; they get a rotated copy instead, and the result line says how many of each.
Editing part of a map in the workspace
Section titled “Editing part of a map in the workspace”- Select prefabs on the map and choose Edit Selection In Workspace. They are captured into a new document, pivoted at their own center, and the map is untouched.
- Build. Every edit lands on the document’s history, not the map’s.
- Finish with Apply Back To Map, which deletes the originals and puts what you built where they were as one undo step, or with Place On Map, which drops the document where the center of your view of the map meets the ground (25 meters ahead when that view shows sky) and leaves the originals alone.
Placing a pack as a monument in a generation
Section titled “Placing a pack as a monument in a generation”A pack in your library can also be placed by procedural generation, as a monument of its own. In Creator Mode, open the Procedural Generation panel’s MONUMENTS section, choose the pack under Custom, press ADD PACK and set its rules: how many, which biomes, how far from any other monument, the steepest ground, dry land only, and whether it stands beside a road (on by default; with no roadside spot it is placed clear of roads instead). The generation places it where a monument goes, sets the pack’s saved ground into the map and blends it into the land around it, and the rest of the generation keeps clear of it. A generated placement takes the map’s natural ground (grass, sand, snow) under the pack, while a pack you place by hand keeps every ground texture you painted. The pack’s own volumes (the ones in its VOLUMES block) come with every generated copy, at that copy’s own position and turn, as they do when you place the pack by hand; undoing the generation takes them back. Mark entrances on the pack and the generation builds a road, a trail, a rail spur or a powerline to each one, and places the pack before those networks instead of beside a road. The details are in Custom monuments.
On a plain server every ordinary prefab in the pack appears, and the pack’s name shows on the in-game map at its center. Building blocks, wiring, loot, NPC spawners and volumes in the pack need the Creator server extension, as they do for any placed custom prefab. A later generation tells you if the pack has changed since.
Swapping a monument for a pack
Section titled “Swapping a monument for a pack”A pack can also take the place of a monument that is already on the map: the same spot, the same facing, and the roads, trails, rails and powerlines that were built to the monument still arrive where they did. The swap does not touch them, which is why they are kept.
- Select the monument on the map.
- In the transform inspector, find Swap For Pack. Leave Use the pack’s ground off to keep the ground as it is, or turn it on to lay the pack’s own saved ground over it. Leave Fill the monument’s holes on to close the holes the monument cut in the ground and then cut the pack’s own. On a monument with a way down to the train tunnels, leave Keep the train tunnel entrance on to have its stairwell placed again.
- Press SWAP FOR PACK and pick a pack from your library.
- Read the list that opens. It says what the swap keeps, what comes back and what is lost, with this monument’s own numbers, and whether your pack is larger than the monument’s bounds.
- Press SWAP. One undo puts the monument back.
None of the monument’s own content comes with the swap: the pack must bring its own. A monument’s loot, NPCs, puzzles, doors, recyclers, radiation and safe zone all live inside Rust’s own prefab, and they leave with it. The list in step 4 counts them for the monument you picked. Three losses reach the whole server and lead the list when they apply: Launch Site is the only place the Bradley APC spawns, the Harbors are the cargo ship’s only docks, and the Power Plant is the center of the power grid.
| What | After the swap |
|---|---|
| Position and facing | Kept: the pack’s pivot takes the monument’s own. |
| Ground, topology and biome | Kept as generated, unless you turn on Use the pack’s ground. |
| Roads, trails, rails, powerlines | Kept. They are part of the map, not of the monument. |
| The train tunnel station below it | Kept. |
| The stairwell down to that station | Placed again for 12 monuments (see below), with Keep the train tunnel entrance on. |
| Rocks, trees and decor cleared around it | Kept. |
| Its name on the in-game map | Kept as plain text. The game’s translated name and its map icon are not. |
| Loot, NPCs, puzzles, doors and other devices, radiation, safe zone, no-build areas | Lost. The pack’s own are what the map has. |
| The Bradley, the cargo dock, the excavator and similar machines | Lost. No pack can carry them. |
The pack arrives as one group: a click on any piece selects all of it, Alt and a click takes one piece, and moving the group moves the map label with it. Select any piece to see Swapped Monument in the inspector, where Name is the label players see; clear it to show the monument’s own name again, which is what an empty Name means in the generation’s Swap block too. Deleting the pieces, or ungrouping them, removes the label from the saved map.
The train tunnel entrance. Twelve monuments have a stairwell down to the train tunnels: Ferry Terminal, both Harbors, Airfield, Giant Excavator Pit, Military Tunnel, Power Plant, Train Yard, Water Treatment Plant, the Radtown apartment complex, Outpost and Launch Site. The station and the passage below are part of the map and stay, but the stairwell’s top (its shell, elevator, door and call button) is part of Rust’s monument and leaves with it. With Keep the train tunnel entrance on, Creator places that stairwell again at its own spot, as one more piece of the pack’s group, and keeps its opening in the ground when it fills the monument’s other holes. Leave room for it in your pack: it stands where it stood in the monument. Turn the option off and the station below keeps no way up. The four small train tunnel entrance bunkers cannot keep theirs.
A generation can do the same exchange for you: in Creator Mode the Procedural Generation panel’s MONUMENTS section has a Swap block, which swaps every placed copy of a monument at the end of the run. See Swap.
A pack larger than the monument’s bounds is allowed, and the list says by how much on each side, because generated rocks, trees and roads may stand in that ground. A pack built from scratch is the usual case: Break Monument Into Prefabs can give you a starting pack for only eight of the named monuments (the four Underwater Labs and the four Abandoned Military Bases).
Sockets
Section titled “Sockets”Sockets are the connection points that let pieces snap together. Sockets are available on the lab modules, train tunnels, coastal cliff decor and cave kits. Dragging a piece with a socket looks for a compatible free socket within the snap radius (8 meters by default) and mates onto it. Snap Rotation, on by default, turns the piece to face its partner. Move Individually, off by default, decides whether a drag takes the whole connected chain (off) or the one piece and breaks its links (on). Links are saved with the pack by socket name, so a pack comes back joined the way you left it.
Sixteen bunker rooms have no sockets.
The files a pack is, and moving packs between editors
Section titled “The files a pack is, and moving packs between editors”Saving writes the .prefab, a companion file and a .png thumbnail; copy all three when moving a pack.
The companion file keeps what the .prefab has no room for, including the pack’s entrances.
Packs move between Creator and RustEdit.