
The map overview
The overview is your map seen from above, drawn the way the in-game map draws it, with your roads, rivers, monuments, labels and markers on top of it. It is how you check that a map reads as a place rather than as a heightfield, and it is what you export when you want a picture of the map to show someone.
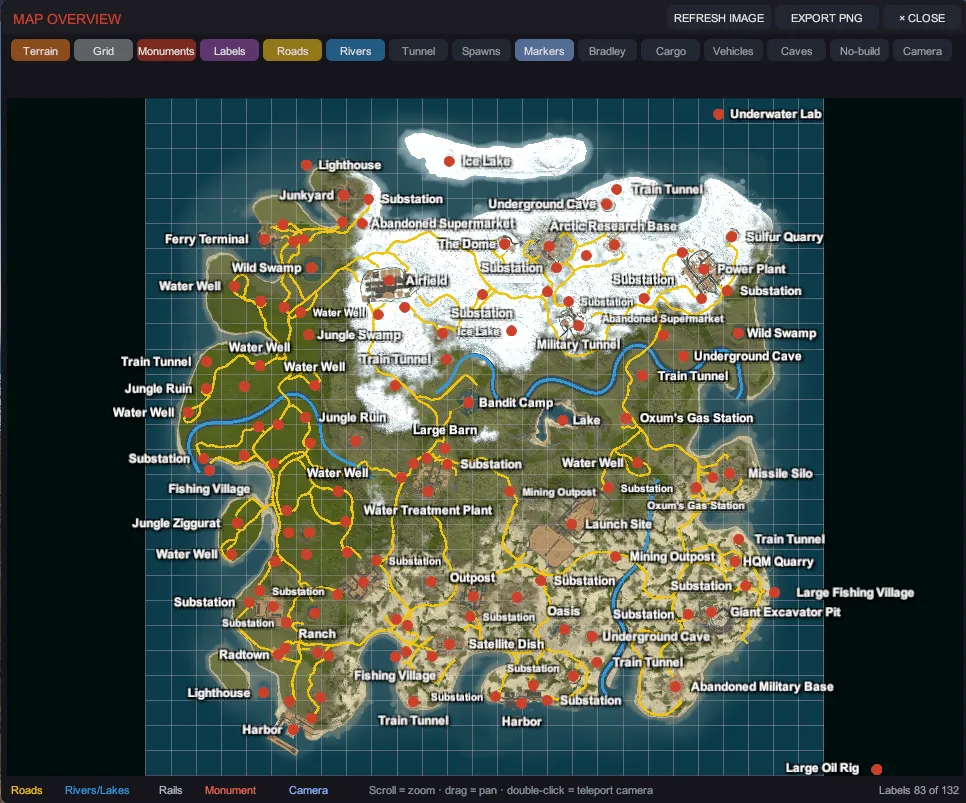
Open it with Tab, with VIEW > Map Overview, or with its button on the tool rail.
The window opens at once and draws its picture of the ground in the background, so Creator keeps
working while it does. Until the picture is ready the window shows the last one it drew of this map.
The first time you open it on a map there is none, so the map area stays dark and the status line
reads Drawing the map image.
The layers are drawn straight away, and you can zoom, pan and teleport while you wait.
Move around it
Section titled “Move around it”| Input | What it does |
|---|---|
| Scroll | Zoom. |
| Drag | Pan. |
| Double-click | Teleport the camera to that spot on the map, so you can go and look at what you just noticed. |
The layers
Section titled “The layers”Fifteen toggles run along the top of the window, on two rows when the window is narrow. Each one is remembered between sessions. Point at a toggle and the status line beside them says what it draws.
| Toggle | What it draws |
|---|---|
| Terrain | The ground as the in-game map draws it. |
| Grid | The lettered and numbered map grid. |
| Monuments | A dot per monument. |
| Labels | The monument name beside every monument dot, at every zoom, the way the in-game map names them. |
| Roads | Roads, trails and rails. Roads draw amber and rails gray. |
| Rivers | Rivers and lakes, in blue. |
| Tunnel | The underground train tunnel network. Off by default, and empty on a map that has none. |
| Spawns | Where Rust will spawn new players. Off by default. See Where players spawn. |
| Markers | Your own map markers. |
| Bradley | The Bradley paths you drew with Vehicles and Patrols, as lines. Empty on a map that has none. |
| Cargo | The ocean path the cargo ship sails, in a lighter blue than a river. A ring that GENERATE RING is offering and you have not accepted yet is drawn dashed. Empty on a map that has neither. |
| Vehicles | A square on every vehicle you placed with Vehicles and Patrols. Empty on a map that has none. |
| Caves | A diamond on every cave. Off by default. |
| No-build | An outline round every place building is blocked: the no-build volumes placed on the map, a bridge’s included, and the zones each monument carries. Off by default. |
| Camera | A wedge showing where the viewport camera is standing and which way it faces. |
Bradley, Cargo and Vehicles start on, because they draw only what you authored: a map with no path, ring or placed vehicle looks the same with them on. Tunnel, Caves and No-build start off, because nearly every map has something for them to draw and they are there for when you want to check it.
The legend along the bottom names the colors for roads, rivers and lakes, rails, monuments and the camera. A second legend row appears above it while any of Bradley, Cargo, Vehicles, Caves or No-build is on, and names those in the colors they are drawn in.
No-build draws the zones as seen from above, so a tall box and a flat one look the same. On a map with thousands of zones it draws the largest first and stops at a limit; the second legend row then reads, for example, no-build zones 900 of 1400 (zoom in for the rest), and zooming in brings the smaller ones back. It shows the zones and nothing else: a server can refuse a foundation for other reasons, and those are not drawn.
Where players spawn
Section titled “Where players spawn”A Rust server does not keep a list of spawn points. Each time a player spawns it picks a spot on a beach that fits one rule: the ground is Beach, Oceanside and Mainland together, in Tier 0 or Tier 1, in a Temperate or Tundra biome, with no cliff, road, river, lake, rail, swamp or monument painted on it, and at least 50 meters from every monument’s bounds. Turn on Spawns and the overview draws that rule over your own map, from the same topology and biome layers the server will read:
| Color | What it means |
|---|---|
| Green | Players can spawn here. |
| Amber | It fits the rule but is within 50 m of a monument. Move or remove the monument and it turns green. |
| Pink | It would fit but for one thing: the biome, one layer painted over it, or one missing layer. This is the color that tells you why a beach is not a spawn beach. |
The status line says how many cells are green. If none is, nobody can spawn on the map: the server-ready check blocks on exactly that, and a map whose whole coast is Arid, Arctic or Jungle is the usual cause (every beach shows pink).
It shows where a spawn may land. The server also turns down a spot under a rock, a tree or a building, and one within 5 meters of another player or a base, which no map layer holds. On a large map the picture is drawn in coarser squares so it stays quick; zoom does not change which cells count.
The labels
Section titled “The labels”Every monument on screen gets its name, at every zoom level. The names are white, bold and outlined, so they read over snow, sand and rock alike, and they grow a little as you zoom in.
Where monuments sit close together, Creator moves a name rather than dropping it. Close names are nudged apart. Only when a name has nowhere left to go is it hidden, and the legend says so, on the right: labels 81 of 84 means three monuments in the frame could not be fitted. Zoom in and they come back, because the dots spread apart as you do.
A monument is named the way the game names it. One that carries no in-game name is named after its prefab instead, so no monument on your map is ever left blank. A map label, the kind community maps place to name an area, reads its own text, the way the game draws it. A monument you gave a map name shows what players will see: your name alone where the game shows none, and the game’s name followed by yours where it shows its own.
Keeping it current
Section titled “Keeping it current”The image updates when the terrain changes, drawn in the background the same way: you see the previous picture until the new one is ready. The layers drawn over it follow your edits too: paint topology or biome, or move or delete a prefab, and the monuments, Caves, No-build and Spawns layers are read again a moment later. If you ever doubt what you are looking at, REFRESH IMAGE redraws it and says so in the status line.
It is drawn by Rust’s own map-rendering rules, so a map you look at here reads like the same map would on a server: the same ground colors, the same relief shading, the same blue that deepens with the water, and monuments named the way the game names them rather than by their prefab filename.
Recent-map cards on the start screen show this image.
Export a PNG
Section titled “Export a PNG”EXPORT PNG writes a 2048 by 2048 image next to your map, named after it with -overview
appended, for example my-island-overview.png. The status line prints the full path it wrote.
The export burns exactly the layers you can see. Turn the labels on if you want labels, turn the camera wedge off if you do not want an arrow in the picture, then export. The export is sharp at any window size.
A map you have not saved yet has nowhere of its own to write to, so its export goes into Creator’s
own data folder as map-overview.png. Save the map first if you want the image beside it.
If the export cannot run, the status line says why rather than failing silently: Export failed: no map rendered. means there is no map loaded to draw.
Export the map image at your own size
Section titled “Export the map image at your own size”EXPORT PNG above is the overview as you see it, at one size. FILE > Export Map Image… writes the map image by itself: the picture the game draws for its own map, at the sizes you ask for, with or without icons. It opens a window; nothing is written until you press EXPORT MAP IMAGE.
Every setting starts at the game’s own value, so an export you change nothing in is the image the game itself would make of your map, ocean margin included.
| Setting | What it does | The game’s value |
|---|---|---|
| Pixels per meter | How big the image is: how many pixels one meter of the map takes. From 0.1 to 4. | 0.5, so a 4000 m map is 3000 pixels across with its margin |
| Ocean margin (m) | How much ocean is drawn round the map. 0 crops the image to the map. | 1000 |
| Shading | How strongly slopes are lit and shaded. 0 is a flat image; 2 is twice the game’s relief. | 1 |
| Brightness | The whole image, lighter or darker. | 1.05 |
| Contrast | More or less difference between light and dark ground. | 0.94 |
| Extra sizes (px) | More copies to write beside the first, as pixels a side, separated by commas: 1024, 4096. | none |
| Icons | Without icons, With icons (each monument’s dot and name, and your map markers, drawn at that image’s size), or Both. | without |
| Color land by | Ground textures, as the game’s own map does, or Biomes: each spot takes its biome’s color, mixed where two biomes meet. Water, relief shading, contrast and brightness stay the game’s either way. | ground textures |
| Map colors | The colors the image is drawn with, each typed as six hex digits beside a swatch of it (#5A5E34). | see below |
The line under the settings says what will be written and whether it is still the game’s own image, for
example 2 images: 3000 px, 1023 px square. The game's own map image. or Differs from the game's map image in shading, contrast. GAME SETTINGS puts the settings back; the colors have their own
button.
Shading, brightness, contrast and the colors change that export and nothing else. The Map Overview, the pictures on the start screen and the map players see in the game are always the game’s own image. The settings last until you close Creator; the next launch starts from the game’s values again.
Map colors
Section titled “Map colors”Open Map colors to change the palette. It lists the colors the image uses for the way the land is colored:
| Colored by | The colors listed |
|---|---|
| Ground textures | Base color (where the ground has no texture), the eight ground textures (Dirt, Snow, Sand, Rock, Grass, Forest, Stones, Gravel), Water color and Deep water color |
| Biomes | Arid, Temperate, Tundra, Arctic and Jungle, then the two water colors |
Type a color and press Enter; the swatch shows it at once. A color you type that is not six hex
digits is refused with a line saying so, and the old color stays.
The ground and water colors start as the game’s own map colors, so until you change one the image is still the game’s. The game’s map has no biome colors at all, so the five biome colors are Creator’s own: Arctic is the game’s snow color, the other four are picked to read apart at a glance. DEFAULT COLORS puts every color back.
The colors you change are remembered between sessions, unlike the other settings in the window.
EXPORT MAP IMAGE asks for a file name, starting in your map’s folder with <map>-map.png. The first
image takes exactly that name, and the others go beside it:
| File | What it is |
|---|---|
island-map.png | The image at Pixels per meter. |
island-map-icons.png | The same with icons, when Icons is Both. |
island-map-1024px.png | An extra size. The number is the side it came out at, which can be a pixel or two under what you typed. |
island-map-1024px-icons.png | That size with icons, when Icons is Both. |
The save dialog asks before replacing the first file. When the export’s other files are already in the folder too, Creator lists them and asks once more before replacing them; GO BACK writes nothing.
The images are written in the background, one after the other, so Creator keeps working while they are
made. The line under the window’s button says which one it is on (Writing 3 of 8: island-map-1024px.png)
and then what was written. One export runs at a time. Opening another map stops an export before its next
image.
The window refuses to export while a map is loading, generating or running a whole-map operation, and says which.